We’ve all been there. You load some third-party CSS for a date picker and you need to overwrite some CSS to make if fit the visual design language of your project. Suddenly, you’re fighting CSS specificity and slapping an important! after every line of CSS. There must be a better way of layering your CSS, right?
What are CSS Cascade Layers?
You can use CSS Cascade Layers for this. Currently, with any webpage, there are already two CSS Cascade Layers being loaded. Firstly, the browser styles layer is loaded. For instance, buttons in let’s say Chrome already has some styles applied to them. Then, when you add your own CSS, you basically add another CSS Cascade Layer. This layer is more specific than the browser styles layer and your CSS is applied.
So what if we can add another layer? And another? This can be very useful in the date picker example. If we scope that a bit bigger, we actually need a vendor layer. In this layer, right after the browser layer, we load all vendor styles. Then next, we can load our regular CSS layer. It might look a bit like this:
This way, you don’t need to combat any vendor styles and have everything needly stacked. This is what CSS Cascade Layers allow you to do.
How do I use it?
One of the lovely things about CSS (❤️) is that the syntax is usually very simple. You can add a new CSS Cascade Layer like this:
@layer vendor {
  .datepicker {
    /* Your datepicker styles */
  }
}
You first declare a layer with the @layer keyword, next you give it a sensible name and finally you can write your CSS. Easy, right?
You can declare as many layers as you want in the same manner. But, what if you need to add something to this vendor layer? Do you then always need to put everything in this specific piece of your CSS code? You can actually add to this layer similarly to how you normally add extra styles to, let’s say, a class. When you reference this layer again, you can add additional styles:
@layer vendor {
  .datepicker {
    /* More datepicker styles */
  }
}
Is the order of declaring these layers important?
Yes and no. The order you declare these layers is how you can order your stack, but this isn’t always very practical. More often than not, you have multiple CSS (or SCSS) files in your project that get bundled into one CSS file. So how can you make sure that the order of the stack is always the way you want it? You can set a specific order in CSS like this:
@layer normalize, vendor;
Simply add a comma-separated list after the @layer keyword to set a specific stack order.
Where does your non-layer-appointed CSS fit in all of this?
Your “regular CSS” is ordered right after the set layers in the stack. Naturally, you can add this to a named layer as well, but there is a catch. CSS that is not in a layer is always more specific than any CSS layer. That’s good to keep in mind.
Can you start using this now?
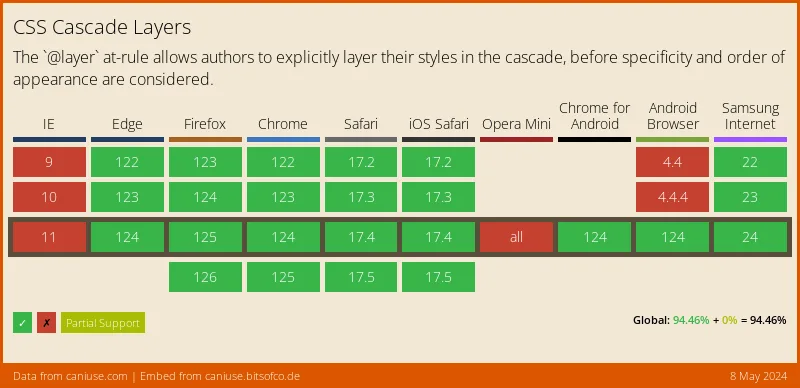
The browser support at the time of writing is fairly decent, but keep an eye out for some of these browsers that do not support it yet:

Closing thoughts
CSS Cascade Layers are a much-welcome addition to CSS. It will not just help with combatting specificity, but allow you to neatly stack and group your CSS as well. Be sure to try it out and thanks for reading!


